Automation rules
With subscriptions up-and-running, it is important to stay up-to-date with customers. It is efficient to use automation to avoid having to manually go through the list of subscribers to see how things are going. That is where Odoo’s automation rules feature comes into play.
The Odoo Subscriptions application allows users to set up automatic emails, create tasks for salespeople, and even send satisfaction surveys for subscribers to evaluate their experience.
Create automation rules
To create an automated rule, start by navigating to . This is where all the automation rules for subscriptions can be found.
The Automation Rules page shows each rule’s Name, Action To Do, what the automated rule will Trigger On, and the Company to which the rule applies.
To view or modify any existing automation rule, simply click the desired rule from this page.
Note
When modifying an existing automation rule, Odoo “grays-out” the Action section of the form, and provides the following warning: Action data can not be updated to avoid unexpected behaviors. Create a new action instead.
To create a new automation rule, click New.

Clicking New reveals a blank Automation Rules form with numerous fields to configure.

Automation rule form fields
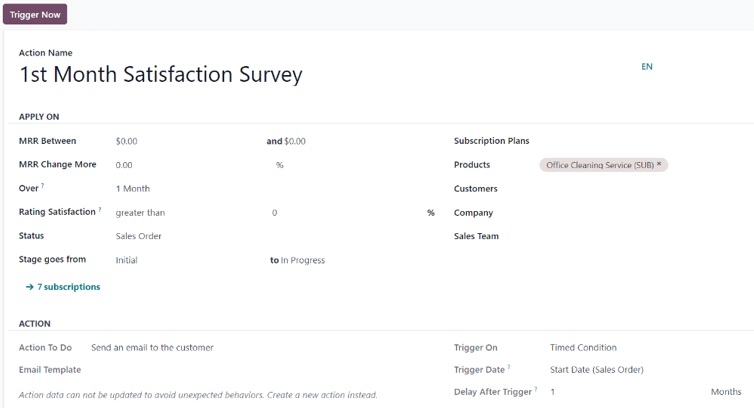
Action Name: title of the automated action rule.
Apply On section
The Apply On section dictates which subscription orders/customers this automated action applies to.
MRR Between: designate a range of monthly recurring revenue to target.
MRR Change More: designate a change of monthly recurring revenue to target, in either percentage or unit of currency.
Over: choose a period of time over which the designated KPIs (Key Performance Indicators) are calculated.
Rating Satisfaction: designate satisfaction as greater than or less than a percentage.
Status: select the status of the subscriptions to be included in this automation rule. The options are: Quotation, Quotation Sent, Sales Order, and Cancelled.
Stage goes from: designate when the automation rule should be activated using two fields that represent two different stages of the subscription.
Subscription Plans: choose specific subscription plans to target with the automation rule.
Products: select specific product(s) to target with the automation rule.
Customers: select specific customer(s) to target with the automation rule.
Company: in a multi-company environment, select a specific company’s subscription data to target with the automation rule.
Sales Team: select the data of specific sales team(s) to target with the automation rule.
Note
If any field is left blank, the rule applies to every subscription without that specific designation.
Tip
The number of subscriptions that match the configured criteria of the customized automation rule are displayed at the bottom of the Apply On field.
If that green subscriptions link is clicked, Odoo reveals a separate page showcasing all the subscriptions that meet that automation rule’s criteria.
Action section
The Action section dictates what action occurs when an automated rule is triggered.
In the Action To Do field, choose the action that will occur once the automated rule is triggered. When clicked, the following options become available on a drop-down menu:
Create next activity: creates the next activity to occur, which is configured in the Activity section that appears at the bottom of the automation rule form.
Send an email to the customer: sends an email to the customer(s) who fit the specified criteria of the automation rule.
Send an SMS Text Message to the customer: sends an SMS message to the customer(s) who fit the specified criteria of the automation rule.
Set Contract Health value: set the health value of the subscription contract.
If Send an email to the customer is selected in the Action To Do field, the following field appears:
Email Template: create (and edit) a new email template or select from a list of pre-configured email templates to send to the customer(s).
If Send an SMS Text Message to the customer is selected in the Action To Do field, the following field appears:
SMS Template: create (and edit) a new SMS template or select from a list of pre-configured SMS templates to send to the customer(s).
If Set Contract Health value is selected in the Action To Do field, the following field appears:
Health: designate the health of the subscription by choosing one of the following options: Neutral, Good, or Bad.
In the Trigger On field, decide whether the automated rule should be triggered on a Modification or Timed Condition.
Note
A Trigger Now button appears at the top of the automation rule form only when a trigger has been configured for the rule.
Warning
When the Trigger Now button is clicked, Odoo will trigger the action on all linked subscriptions, regardless of possible timed conditions.
If Timed Condition is selected in the Trigger On field, the following fields appear:
Trigger Date: represents when the condition should be triggered. If left blank, the action is created upon subscription creation and updates.
Delay After Trigger: select a delayed amount of time (Minutes, Hours, Days, or Months) for Odoo to wait before triggering the configured action. If a negative number is entered, the “delay” will occur before the Trigger Date.
Activity section
If Create next activity is selected in the Action To Do field, an Activity section appears at the bottom of the Automation Rules form.
Activity Type: select an pre-configured activity type from the drop-down menu.
Title: enter a custom title for the chosen activity.
Note: leave a note for the employee to whom the activity is assigned.
Due Date In: enter an amount of days within which the activity should be completed.
Assign To: choose to assign the specified activity to either: Subscription Salesperson, Sales Team Leader, or Specific Users.
Note
If Specific Users is selected as the Assign To option, a new Specific Users field appears beneath it, where a specific employee(s) can be chosen as the assignee(s) for the configured activity.