Brazil
Introduction
With the Brazilian localization, sales taxes can be automatically computed and electronic invoices (NF-e) for goods can be sent using AvaTax (Avalara) through API calls. Moreover, taxes for services can be configured.
For the goods tax computation and electronic invoicing process, you need to configure the contacts, company, products, and create an account in Avatax need to be configured in the general settings.
For the services taxes, you can create and configure them from Odoo directly without computing them with AvaTax.
The localization also includes taxes and a chart of accounts template that can be modified if needed.
Configuration
Install the 🇧🇷 Brazil fiscal localization package to get all the default accounting features of the Brazilian localization, following the IFRS rules.
Configure your company
To configure your company information, go to the app and search the name given to your company.
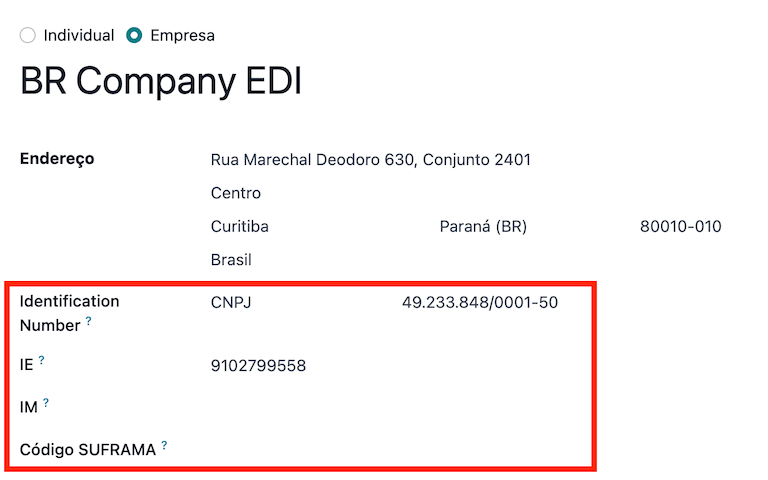
Select the Company option at the top of the page. Then, configure the following fields:
Name.
Address (add City, State, Zip Code, Country).
In the Street field, enter the street name, number, and any additional address information.
In the Street 2 field, enter the neighborhood.
Identification Number (CNPJ, CPF).
Tax ID (associated with the identification type).
IE (State registration).
IM (Municipal registration).
SUFRAMA code (Superintendence of the Manaus Free Trade Zone - add if applicable).
Phone.
Email.
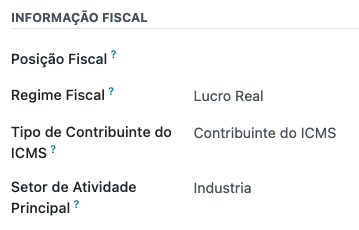
Configure the Fiscal Information within the Sales and Purchase tab:
Add the Fiscal Position for Avatax Brazil.
Tax Regime (Federal Tax Regime).
ICMS Taxpayer Type (indicates ICMS regime, Exempt status, or Non-Taxpayer).
Main Activity Sector.
Finally, upload a company logo and save the contact
Note
If you are a simplified regime, you need to configure the ICMS rate under .
Configure AvaTax integration
Avalara AvaTax is a tax calculation and electronic invoicing provider that can be integrated in Odoo to automatically compute taxes by taking into account the company, contact (customer), product, and transaction information to retrieve the correct tax to be used and process the e-invoice afterward with the government.
Using this integration requires In-App-Purchases (IAPs) to compute the taxes and to send the electronic invoices. Whenever you compute taxes, an API call is made using credits from your IAP credits balance.
Note
Odoo is a certified partner of Avalara Brazil.
Credential configuration
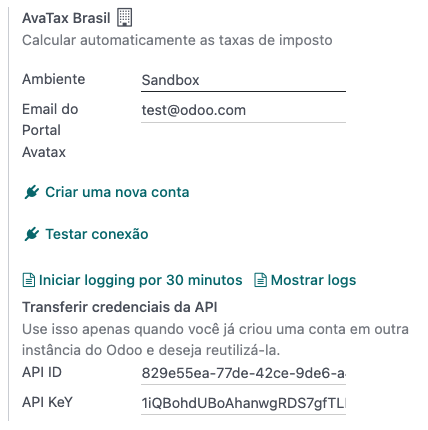
To activate AvaTax in Odoo, you need to create an account. To do so, go to , and in the AvaTax Brazil section, add the administration email address to be used for the AvaTax portal in the Avatax Portal Email, and then click on Create account.
Warning
When testing an Avatax Portal Email integration in a testing or sandbox database, use an alternate email address. It is not possible to re-use the same email address on the production database.
After you create the account from Odoo, you need to go to the Avalara Portal to set up your password:
Access the Avalara portal.
Click on Meu primeiro acesso.
Add the email address you used in Odoo to create the Avalara/Avatax account, and then click Solicitar Senha.
You will receive an email with a token and a link to create your password. Click on this link and copy-paste the token to allocate your desired password.
Tip
You can start using AvaTax in Odoo for tax computation only without creating a password and accessing the Avalara portal in the Odoo database. However, in order to use the electronic invoice service, you must access the AvaTax portal and upload your certificate there.
Note
You can transfer API credentials. Use this only when you have already created an account in another Odoo instance and wish to reuse it.
A1 certificate upload
In order to issue electronic invoices, a certificate needs to be uploaded to the AvaTax portal.
The certificate will be synchronized with Odoo, as long as the external identifier number in the AvaTax portal matches - without special characters - with the CNPJ number, and the identification number (CNPJ) in Odoo matches with the CNPJ in AvaTax.
Configure master data
Chart of accounts
The chart of accounts is installed by default as part of the data set included in the localization module. The accounts are mapped automatically in their corresponding taxes, and the default account payable and account receivable fields.
Note
The chart of accounts for Brazil is based on the SPED CoA, which gives a baseline of the accounts needed in Brazil.
You can add or delete accounts according to the company’s needs.
Journals
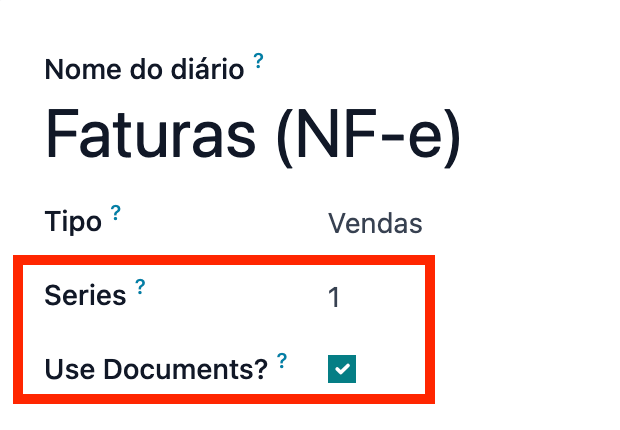
In Brazil, a series number is linked to a sequence number range for electronic invoices. The series number can be configured in Odoo on a sales journal from the Series field. If more than one series is needed, then a new sales journal will need to be created and a new series number assigned to it for each series needed.
The Use Documents field needs to be selected. When issuing electronic and non-electronic invoices, the Type field selects the document type used when creating the invoice. The Type field will only be displayed if the Use Documents field is selected on the journal.
Note
When creating the journal, ensure the field Dedicated Credit Note Sequence is unchecked, as in Brazil, sequences between invoices, credit notes, and debit notes are shared per series number, which means per journal.
Taxes
Taxes are automatically created when installing the Brazilian localization. Taxes are already configured, and some of them are used by Avalara when computing taxes on the sales order or invoice.
Taxes can be edited, or more taxes can be added. For example, some taxes used for services need to be manually added and configured, as the rate may differ depending on the city where you are offering the service.
Important
Taxes attached to services are not computed by AvaTax. Only goods taxes are computed.
When configuring a tax used for a service that is included in the final price (when the tax is not added or subtracted on top of the product price), set the Tax Computation to Percentage of Price Tax Included, and, on the Advanced Options tab, check the Included in Price option.

Warning
Do not delete taxes, as they are used for the AvaTax tax computation. If deleted, Odoo creates them again when used in an SO or invoice and computing taxes with AvaTax, but the account used to register the tax needs to be re-configured in the tax’s Definition tab, under the Distribution for invoices and Distribution for refunds sections.
See also
Products
To use the AvaTax integration on sale orders and invoices, first specify the following information on the product:
CEST Code (Code for products subject to ICMS tax substitution).
Mercosul NCM Code (Mercosur Common Nomenclature Product Code).
Source of Origin (Indicates the origin of the product, which can be foreign or domestic, among other possible options depending on the specific use case).
SPED Fiscal Product Type (Fiscal product type according to SPED list table).
Purpose of Use (Specify the intended purpose of use for this product).

Note
Odoo automatically creates three products to be used for transportation costs associated with
sales. These are named Freight, Insurance, and Other Costs. They are already configured, if
more need to be created, duplicate and use the same configuration (configuration needed:
Product Type Service, Transportation Cost Type Insurance, Freight,
or Other Costs).
Contacts
Before using the integration, specify the following information on the contact:
General information about the contact:
Select the Company option for a contact with a tax ID (CNPJ), or check Individual for a contact with a CPF.
Name.
Address (add City, State, Zip Code, Country).
In the Street field, enter the street, number, and any extra address information.
In the Street 2 field, enter the neighborhood.
Identification Number (CNPJ, CPF).
Tax ID (associated with the identification type).
IE: state tax identification number.
IM: municipal tax identification number.
SUFRAMA code: SUFRAMA registration number.
Phone.
Email.
Note
The CPF, IE, IM, and SUFRAMA code fields are are hidden until the Country is set to
Brazil.Fiscal information about the contact under the Sales & Purchase tab:
Fiscal Position: add the AvaTax fiscal position to automatically compute taxes on sale orders and invoices automatically
Tax Regime: federal tax regime
ICMS Taxpayer Type: taxpayer type determines if the contact is within the ICMS regime, if it is exempt, or if it is a non-taxpayer
Main Activity Sector: list of main activity sectors of the contact
Fiscal positions
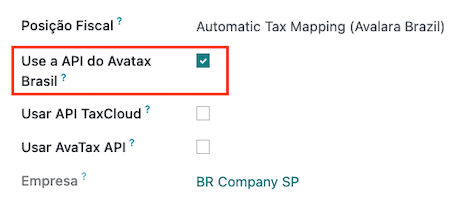
To compute taxes and send electronic invoices on sale orders and invoices, both the Detect Automatically and the Use AvaTax API options need to be enabled in the Fiscal Position.
The Fiscal Position can be configured on the contact or selected when creating a sales order or an invoice.
Workflows
This section provides an overview of the actions that trigger API calls for tax computation, and how to send an electronic invoice for goods (NF-e) for government validation.
Warning
Please note that each API call incurs a cost. Be mindful of the actions that trigger these calls to manage costs effectively.
Tax computation
Tax calculations on quotations and sales orders
Trigger an API call to calculate taxes on a quotation or sales order automatically with AvaTax in any of the following ways:
- Quotation confirmation
Confirm a quotation into a sales order.
- Manual trigger
Click on Compute Taxes Using Avatax.
- Preview
Click on the Preview button.
- Email a quotation / sales order
Send a quotation or sales order to a customer via email.
- Online quotation access
When a customer accesses the quotation online (via the portal view), the API call is triggered.
Tax calculations on invoices
Trigger an API call to calculate taxes on a customer invoice automatically with AvaTax any of the following ways:
- Manual trigger
Click on Compute Taxes Using AvaTax.
- Preview
Click on the Preview button.
- Online invoice access
When a customer accesses the invoice online (via the portal view), the API call is triggered.
Note
The Fiscal Position must be set to Automatic Tax Mapping (Avalara Brazil) for any
of these actions to compute taxes automatically.
Electronic documents
Customer invoices
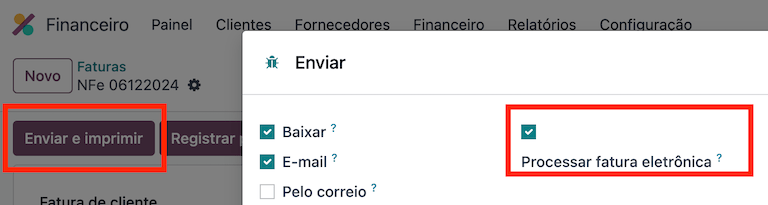
To process an electronic invoice for goods (NF-e), the invoice needs to be confirmed and taxes need to be computed by Avalara. Once that step is done, click on the Send & Print button in the upper left corner, and a pop-up will appear. Then click on Process e-invoice and any of the other options - Download or Email. Finally, click on Send & Print to process the invoice against the government.
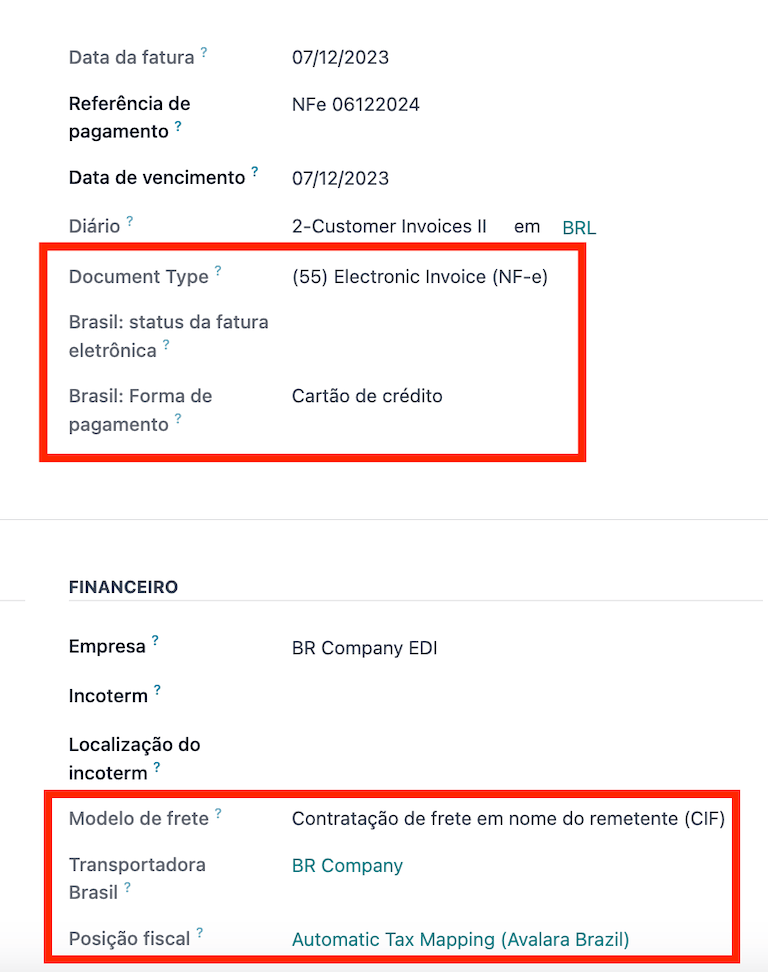
Before sending the electronic invoice for goods (NF-e) some fields need to be filled out on the invoice:
Customer with all the customer information
Payment Method: Brazil (how the invoice is planned to be paid)
Fiscal Position set as the Automatic Tax Mapping (Avalara Brazil)
- Document Type set as (55) Electronic Invoice (NF-e). This is the only
electronic document supported at the moment. Non-electronic invoices can be registered, and other document types can be activated if needed
There are some other optional fields that depend on the nature of the transaction. These fields are not required, so no errors will appear from the government if these optional fields are not populated for most cases:
Freight Model determines how the goods are planned to be transported - domestic
Transporter Brazil determines who is doing the transportation
Note
All of the fields available on the invoice used to issue an electronic invoice are also available on the sales order, if needed. When creating the first invoice, the field Document Number is displayed, allocated as the first number to be used sequentially for subsequent invoices.
Credit notes
If a sales return needs to be registered, then a credit note can be created in Odoo to be sent to the government for validation.
See also
Debit Notes
If additional information needs to be included, or values need to be corrected that were not accurately provided in the original invoice, a debit note can be issued.
Important
Only the products included in the original invoice can be part of the debit note. While changes can be made to the product’s unit price or quantity, products cannot be added to the debit note. The purpose of this document is only to declare the amount that you want to add to the original invoice for the same or fewer products.
See also
Invoice cancellation
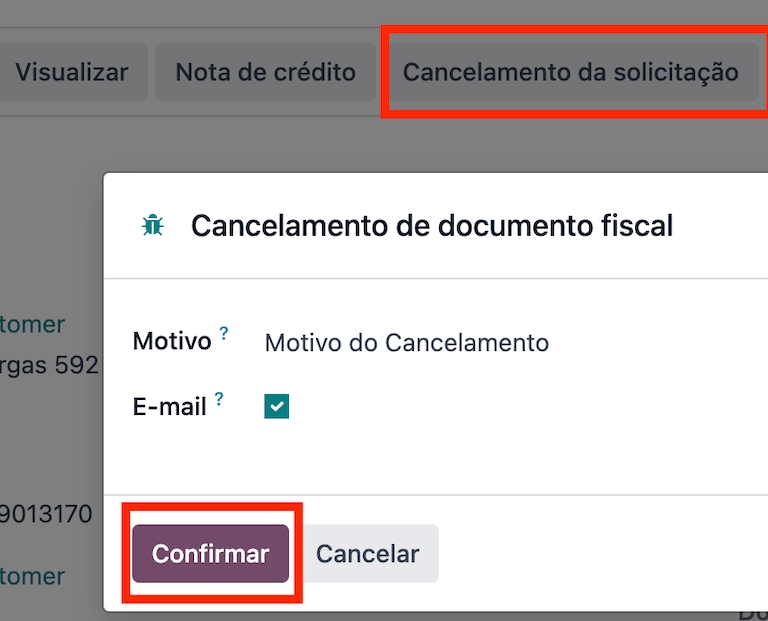
It is possible to cancel an electronic invoice that was validated by the government.
Important
Check whether the electronic invoice is still within the cancellation deadline, which may vary according to the legislation of each state.
This can be done in Odoo by clicking Request Cancel and adding a cancellation Reason on the pop-up that appears. If you want to send this cancellation reason to the customer via email, activate the E-mail checkbox.
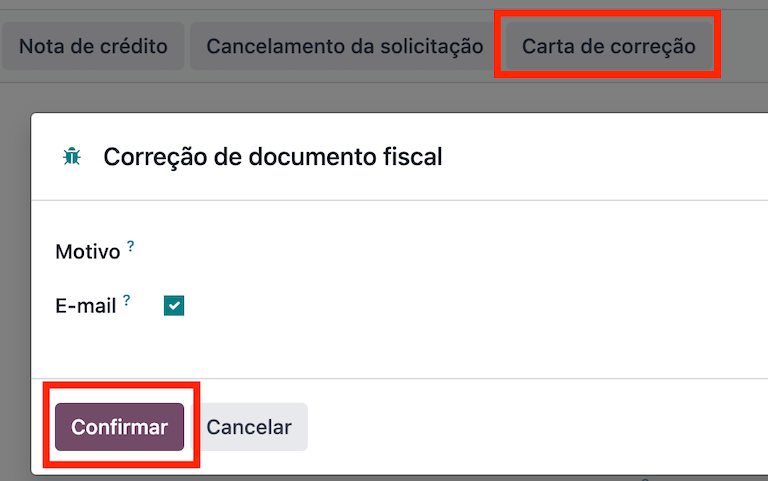
Correction letter
A correction letter can be created and linked to an electronic invoice that was validated by the government.
This can be done in Odoo by clicking Correction Letter and adding a correction Reason on the pop-up that appears. To send this correction reason to a customer via email, activate the E-mail checkbox.
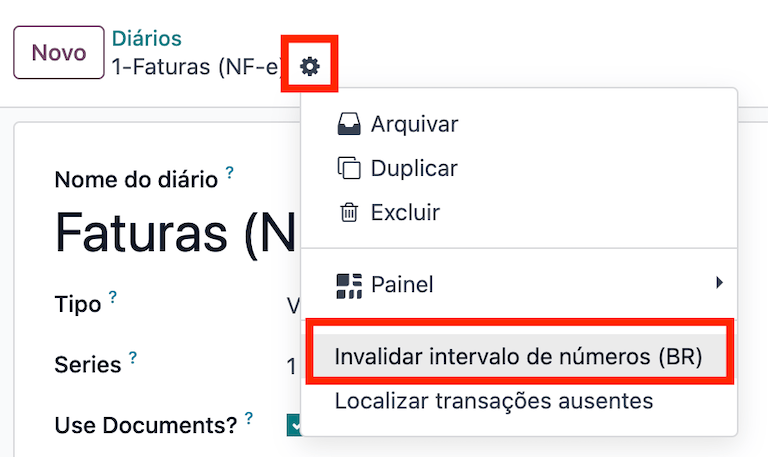
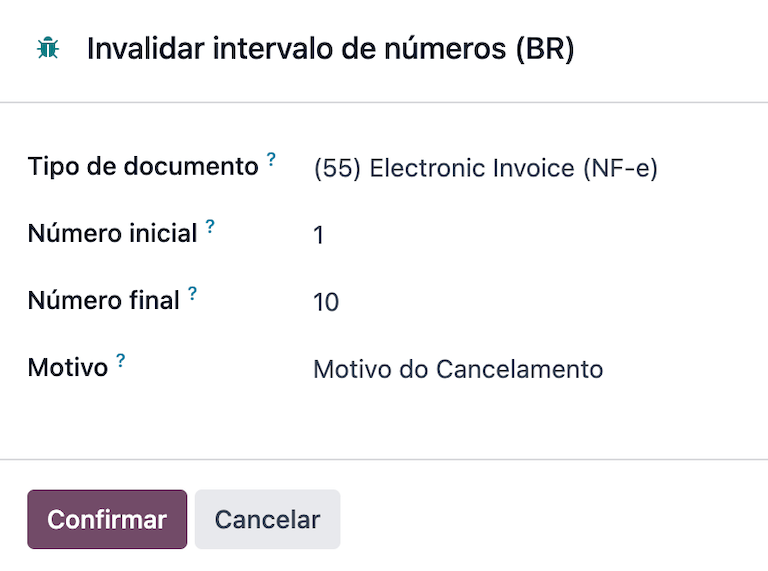
Invalidate invoice number range
A range of sequences that are assigned to sales journals can be invalidated with the government if they are not currently used, and will not be used in the future. To do so, navigate to the journal, and click the . On the Invalidate Number Range (BR) wizard, add the Initial Number and End Number of the range that should be canceled, and enter an invalidation Reason.
Note
The log of the canceled numbers along with the XML file are recorded in the chatter of the journal.
Vendor bills
On the vendor bills side, when receiving an invoice from a supplier, you can encode the bill in Odoo by adding all the commercial information together with the same Brazilian specific information that is recorded on the customer invoices.
These Brazilian specific fields are:
Payment Method: Brazil (how the invoice is planned to be paid).
Document Type used by your vendor.
Document Number (the invoice number from your supplier).
Freight Model (how goods are planned to be transported - domestic).
Transporter Brazil (who is doing the transportation).