Two-step manufacturing
Odoo Manufacturing allows users to manufacture products using one, two, or three steps. When using two-step manufacturing, Odoo creates a manufacturing order (MO) and a pick components transfer, but does not generate a transfer for the movement of finished products into stock. Inventory counts still update based on the number of products manufactured, but the act of transferring them to and from inventory is not tracked.
Tip
The number of steps used in manufacturing is set at the warehouse level, allowing for each warehouse to use a different number of steps. To change the number of steps used for a specific warehouse, begin by navigating to , and then select a warehouse from the Warehouses screen.
On the Warehouse Configuration tab, find the Manufacture radio input field, and select one of the three options: Manufacture (1 step), Pick components and then manufacture (2 steps), or Pick components, manufacture and then store products (3 steps).

Important
Products must be properly configured before they can be manufactured in Odoo. For details on how to do so, see the documentation on how to configure a product for manufacturing.
Create manufacturing order
To manufacture a product in Odoo Manufacturing, begin by navigating to , and then click New to create a new MO.
On the new MO, select the product to be produced from the Product drop-down menu. The Bill of Material field auto-populates with the associated Bill of Materials (BoM).
If a product has more than one BoM configured for it, the specific BoM can be selected in the Bill of Material field, and the Product field auto-populates with the associated product.
After a BoM has been selected, the Components and Work Orders tabs auto-populate with the components and operations specified on the BoM. If additional components or operations are required for the MO being configured, add them to the Components and Work Orders tabs by clicking Add a line.
Finally, click Confirm to confirm the MO.
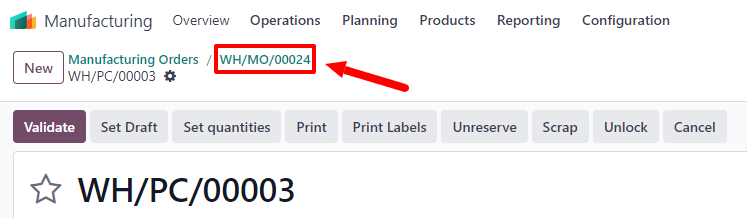
Process pick components transfer
After confirming a two-step MO, a Transfers smart button appears at the top of the page. Click it to open the pick components transfer for the MO. This transfer is used to track the movement of components from the locations where they are stored to the location where they are used to manufacture the product.
After transferring the components out of their storage location, click Validate at the top of the transfer, followed by Apply on the Immediate Transfer? pop-up window that appears. Doing so marks the transfer as Done, and updates inventory counts to reflect the quantity of components transferred.
Finally, return to the MO by clicking the WH/MO/XXXXX breadcrumb at the top of the page.
Process manufacturing order
An MO is processed by completing all of the work orders listed under its Work Orders tab. This can be done on the MO itself, or from the work order tablet view.
Basic workflow
To complete work orders from the MO itself, begin by navigating to , and then select an MO.
On the MO page, select the Work Orders tab. Once work begins on the first work order that needs to be completed, click the Start button for that operation. Odoo Manufacturing then starts a timer that keeps track of how long the work order takes to complete.
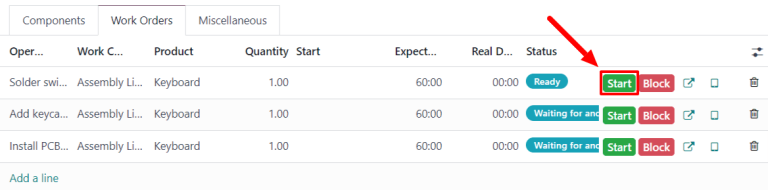
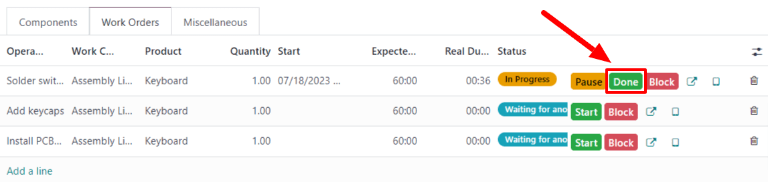
When the work order is completed, click the Done button for that work order. Repeat the same process for each work order listed on the Work Orders tab.
After completing all of the work orders, click Produce All at the top of the screen to mark the MO as Done, and register the manufactured product(s) into inventory.
Shop Floor workflow
To complete the work orders for an MO using the Shop Floor module, begin by navigating to , and then select an MO.
On the MO, click on the Work Orders tab, and then select the ↗️ (square with arrow coming out of it) button on the line of the first work order to be processed. Doing so opens a Work Orders pop-up window, with details and processing options for the work order.
On the pop-up window, select the Open Shop Floor button at the top-left of the window to open the Shop Floor module.
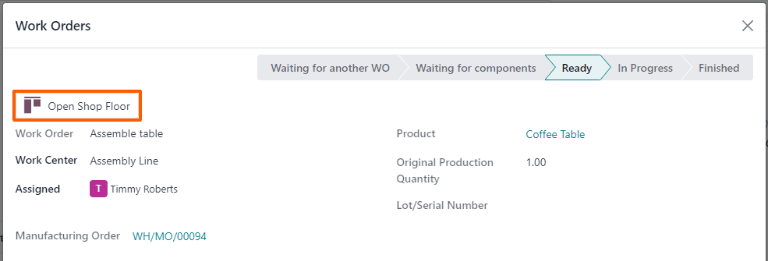
When accessed directly from a specific work order within an MO, Shop Floor defaults to the page for the work center where the work order is configured to be carried out. The page shows a card for the work order that displays the MO number, the product and number of units to be produced, and the steps required to complete the work order.
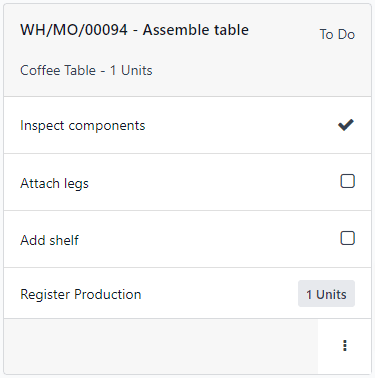
A work order is processed by completing each step listed on its card. This can be done by clicking on a step and following the instructions listed on the pop-up window that appears. Once the step is completed, click Next to move on to the next step, if any are required.
Alternatively, work order steps can be completed by clicking the checkbox that appears on the right side of the step’s line on the work order card. When using this method, the step is automatically marked as completed, without a pop-up window appearing.
The final step on a work order card is titled Register Production. This step is used to register the number of product units that were produced. If the number produced is equal to the number that the MO was created for, click the # Units button on the right side of the line to automatically register that number as the quantity produced.
If a different number must be entered, click the Register Production step to open a pop-up window. Enter the number of units produced in the Units field, and then click Validate to register that number.
Note
The Register Production step appears on every work order card. It must be completed for the first work order that is processed. After doing so, the step appears as already completed for each remaining work order in the MO.
After completing all of the steps for a work order, a button appears on the footer of the work order card. If any other work orders must be completed before the MO can be closed, the button is titled Mark as Done. If there are no additional work orders to complete, the button is titled Close Production.
Clicking Mark as Done causes the work order card to fade away. Once it disappears completely, the work order’s status is marked as Finished on the MO, and the next work order appears in the Shop Floor module, on the page of the work center where it is configured to be carried out. Any additional work orders can be processed using the instructions detailed in this section.
Clicking Close Production causes the work order card to fade away. Once it disappears, the MO is marked as Done, and the units of the product that were produced are entered into inventory.
After clicking Mark as Done or Close Production, each button is replaced by an Undo button. Click the Undo button before the work order card fades away to keep the work order open.
Tip
This section details the basic workflow for processing an MO in the Shop Floor module. For a more in-depth explanation of the module and all of its features, please see the Shop Floor overview documentation.